Advertisement

Monday, January 16, 2017

How to change your folders background in widows 7


The folder background changer is a portable freeware which lets put any image as background for any folder  you want. It not limited to background image and has other options like changing text colors for the files and using shadows for the icons inside the folder.

This nifty freeware that lets Windows 7 users use any wallpaper or image as background for any folder on the computer. It also lets you select the appropriate text colour for files inside the folder. It works on both 32-bit and 64-bit version of Windows 7.


Click the link then select the download source EU or US.


Once you download the software, extract the contents of the ZIP file. Right click on the program file and choose “Run as Administrator”
If you run this tool for the first time, it should restart Windows Explorer. This might not happen on 64 bit version of Windows 7. In this case we will manually need to restart explorer.

The main windows of the program is easy to understand. Once its running choose the folder for which you need to change the image, by clicking Browse.
The Uninstall option is handy. Anytime you need remove any changes made by this software, just click the Uninstall button.
Select the required image by clicking Change Background Image once you have selected the folder
You can also select the text colour  for files located in the folder. If you want same image to be used for all sub folders , select the option which says  “Apply To Sub Folders”.
If you want to display a shadow under the text of all the items in the folder, select “Show Shadow Under Text”. This option will only work with icons view.
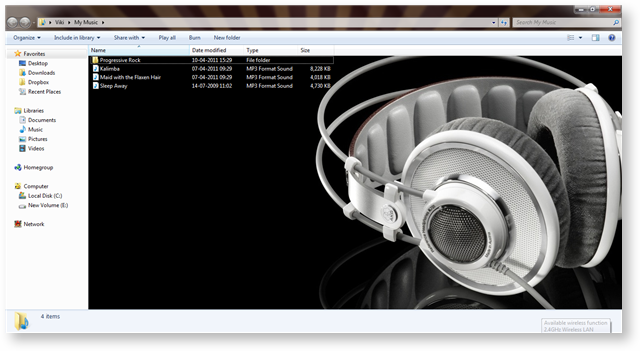
Once you choose all the correct option the image should start showing in the background of your selected folder
If your image is not set, open Windows task manager and end explorer.exe process and restart it.  The image would be applied one your restart Windows Explorer.

Source and images
Special thanks to editor - technorms.com


Tuesday, January 3, 2017

You can try hidden menu on Samsung Galaxy smartphones


Hi guys.!
It is a hidden menu found on Samsung Galaxy smartphones and it can be used for checking whether the device is in good working order.

So by now you're probably wondering how to access this secret menu. Well, you do that by opening the Phone app and entering the code *#0*# as if you were to dial it. The said menu will appear as soon as you input the last symbol.

Most of the options listed in this secret menu aren't particularly interesting. For example, Red, Green, Blue, and Black let you check the screen's output for flaws, such as stuck pixels or color irregularities. But hit Sensor and you'll be taken to a cool-looking screen where raw data from your phone's sensors is displayed. Also, there are graphs visualizing readings from your accelerometer, gyroscope, and compass. Oddly, if you hit Image Test you'll be shown a picture of a chihuahua. This means there's a photo of someone's pet dog hidden in millions of Galaxy smartphones, as silly as it may seem.

The Touch test can be useful if you have doubts about your touchscreen's accuracy. Each rectangle where a tap is detected is highlighted, and your finger's trace is represented by a black line. There's also the Sub key test for checking whether the phone's capacitive keys are in order. The Receiver test checks the earpiece for malfunctions, and the Speaker test blasts a mysterious pop song through the loudspeaker.

So that is Samsung's hidden test menu found on Galaxy handsets. If you're feeling adventurous, feel free to check it out or to search for other secret codes at your own risk. Got any codes you'd like to share? The comments section is all yours!


 source: phonearena.com

Friday, December 9, 2016

How to Make Leaf Skeletons

Leaf skeletons

You need
hard and waxy leaves  (eg: Jack leaves, croton leaves )
Pot
10 Cups of water
Washing soda (Sodium carbonate - Na2CO3)
If u haven't find washing soda you can make it from baking soda How to make washing soda
Metal tongs
If you want to colorize the leaf skeletons
Bleach
Food Color


Mixing water and Na2CO3
First you need mix washing soda with water in pot and boil it In a well ventilated room


Boiling mixture 
Then lower the heat and insert the leaves and simmered for it at least 40 minutes.

After the boiling the mixture
Now the water will look very dark. Then leave it more 30 min to cool.

Removing pulp
Using the tongs, gently remove your leaves from the pot. Place leaves in dish or glass plate, wipe the pulp using water and a small brush.

After the removed pulp
After carefully removed the entire pulp from the leaves. then it placed on the paper serviette to dry properly.

Done it  
In your choice, you can bleach and colored it.

You can use it for decorations
Special thanks..
Source and images: thekreativelife.com, theidearoom.net, google.com

Monday, December 5, 2016

How to use Google Maps offline (Android)


Update: Newest Method added...!

It's possible to use Google Maps offline, which is ideal if you find yourself needing to scope out a route or figure out where you are when you have no Wi-Fi or have run out of your monthly data allowance. Many people use Google Maps almost daily, so being able to download offline maps is a very practical feature.

Here's how to use Google Maps offline.The one caveat to using Google Maps offline is that you will have to use it online in order to store the required data first. With that in mind:
  • Open Google Maps (while online) and search for your desired location.
  • Once you've found the location/area you want, the easiest way to save it for later is to go to the options menu by tapping the three lines (hamburger) icon and tapping Offline area
  • Next, tap the plus or add symbol in the bottom right of the screen and you will prompted with a message that says "download this area?"
  • Drag the map inside the square box until it encompasses the area you want a map of. Pinch to zoom (putting two fingers on the display and bringing them together) to close in on the area you want. Move your fingers in the opposite way to zoom out and encompass a larger area. 
  • Once you are happy with the map area, tap Download.


  • You will be prompted to name your area. Do so in the box that appears.
  • Once you have downloaded the map to your device, you can access it by tapping the menu icon at the top left of the main Maps page and returning to Offline areas, where you should now see your downloaded area. 
 
 Limitations of Offline Maps
There are some limitations to the functionality of the offline maps, mostly regarding the size of the location you’re looking for. You cannot download a map of, say, the whole of Denmark: the box you draw around the area you want has a limited size, and it's not possible to download anything that takes up more than around 1.5 GB of storage space.
Downloaded Google maps tend to require quite a lot of storage space to accommodate the detailed information they provide, so we recommend connecting to Wi-Fi before downloading all the maps you need. Additionally, the maps you download will be stored for 30 days and after this they are automatically deleted, so don't assume they will last forever.


Source: androidpit.com


Tuesday, November 29, 2016

Mobile Phone Hologram Illusion from CD case


The holographic appearance of the late Tupac Shakur onstage at Coachella in 2012 blew minds because of how lifelike and detailed the hologram appeared. The dancing illusion used a technique first described by 16th-century Neapolitan scientist Giambattista della Porta, and later developed by Henry Dircks and John Henry Pepper, from whom it got its name: Pepper’s Ghost.
This illusion originally required almost a whole dedicated room to perform. Nowadays you can make a tiny hologram using just a small acrylic pyramid and your smartphone. Here’s how.

1. Measure and mark


Draw a trapezoid on a piece of paper with a bottom length of 61.5mm, top length of 12mm, and side lengths of 43mm. Trace the shape on the acrylic CD case with your pen, repeating it 4 times.

2. Score and cut


Slowly score the lines drawn on your CD case with a box cutter, and repeat carefully until it cuts through. Take care when removing the cut pieces, as the acrylic has relatively sharp edges.

3. Assemble the pyramid

Place the 4 pieces next to each other along their 43mm sides, and attach them using a thin strip of cellophane tape at each shared edge. When 3 of the edges have been taped, fold them into the shape of a pyramid and tape the remaining edge.

Use it
Simply lay your phone on a flat surface, place the pyramid upside-down on the center of the screen, and conjure up any of the content that’s widely available on YouTube — search for “pyramid hologram” to find videos specially made for this trick. Like magic, you’ll have dancing holograms floating in midair.

Credits: Anthony Lam from Make magazine
Hologram video download


Featured Video